Sunday, April 29, 2012

Porch Update

Again with the rain! Porch painting projects are still not being accomplished because of the impending danger of more storms. 

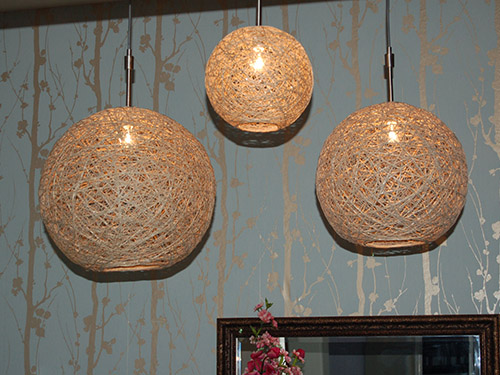
I did have an indoor project waiting for me, however.  As you could see from this post here, I've been thinking about doing something with lanterns and I even DIY'ed one myself.  My interest was caught the other day when I saw these on Pinterest.


I thought it might be fun to mix some of these with lanterns.  They're actually very simple to make.  All you need is tissue paper and a pipe cleaner (or florists wire, if you have that on hand.)  I really wanted gray pom poms but apparently it's very difficult to find! I could order it online, but I don't want it that badly.

Anyways, I followed this tutorial here at Design Dazzle and found it to be very easy to follow.  Feeling very accomplished on this rainy Sunday, I dashed to the porch to see how everything would look together and. I. don't. like. it. 


I like the concept of this idea, but I think using all white is where I went wrong.  It just looks a little too bridal/wedding.


The textures look awesome together, I'll admit, but the all white isn't working.  Wishing now that I'd gone with the gray.  Maybe I'll add some of my other accent colors to it and see what happens.  I am going to try a couple more arrangements to see if I like that better. 


In other porch news, these little guys recently took up residency on the porch.  Aren't they cute?  I am planning to re-pot them soon.


This is one of the fabrics I'm working with.  I really love the geometric pattern.

So it's back to the drawing board on the lighting front.  (Originally I'd thought I'd get a light kit for the DIY'ed lantern, but a friend pointed out to me that all the materials I used are highly flammable, so I decided against it.)

Here are some options I really like from Pinterest


Saturday, April 28, 2012

Trim

As promised, here are the "after" pictures of our new trim!  As you'll be able to tell very quickly, I was at a loss as to what pictures I should choose to best show it off.  My pictures might seem a little, strange since they'll be mostly of the floor region. 


The white really pops against so many of our neutral paint choices.  In our living/dining room we have a faux molding at the top (which is actually plaster) that we painted white from the get-go.  Eric likes the way the dark furniture contrasts with the white.


Here's a better look at that faux molding I was talking about.  Less orange-y wood in the house=score 1 for Lauren!


I was super impressed with the corners!  Granted this is not the best picture, but I think it looks pretty darn professional.  Score 1 for Eric!


White trim has made the biggest difference in this room!  I LOVE the creamy white stripes, white trim, and white curtains.  The brown trim was definitely bringing this room down (see the House Tour page to remember what it looked like before.)  So soothing.


White trim in the guest room.   This was the one room in our house that I actually didn't mind the orange-y trim because it complemented the aqua paint nicely.  After all, blue and orange are complimentary colors (thank you Mrs. North-still carrying art class facts with me after all these years :0)  However, the white in here is still superior to the orange faux wood, times a gagillion!


Our bedroom is the other winner winner chicken dinner, with the prize for biggest impact made by white trim.  Ignore the ugly lamp cord and gaze at the beauty that is white popping against our gray paint.  Gray + white = LOVE.

We're super impressed with how much this relatively inexpensive project has impacted the took of our house.  It just looks so much cleaner and fresher.  Another bonus was that we didn't use all the trim and had a whole, unopened pack to return for more $$.

Hubs even admitted, "if I'd known how good it would look, I would have done it a lot sooner."  He proceeded to comment that after this success, he's ready to tackle the bathroom (his exact words were "if I hadn't run out of time, I was so tempted to rip apart the bathroom.")  I'm going to have to call his bluff on this one.  For now. :0)

Have you done any trimming projects lately?  What are you using your left-overs for?

Thursday, April 26, 2012

Still Alive?

A couple things:
  • Yes, we're still alive.
  • I painted all the trim by myself.
  • Eric is a rock star and did the ENTIRE HOUSE (minus the man cave) rather than just the dining/living room, kitchen, and hallway like we originally planned.
  • IT LOOKS AWESOME, TERRIFIC, SUPER, GREAT, TRES CHIC, BEAUTIFUL (can you tell I work on synonyms often?)
  • Our house is a mess because we had to pull all sorts of furniture out to finish the project.
  • Pictures will follow when the house is clean again.
  • No, I still have not gotten to all my porch painting projects because every time I have some dang free time, it rains!
  • WHY IS THERE NOT AN IKEA CLOSER TO ME THAN CHICAGO?!?!?!?!?!?


I love this idea of flipping a (sturdy) bookcase over and turning it into a window seat.

Monday, April 16, 2012

Working Girl

Oh boy, am I tired!  Today I've been a trim-painting, speech room-organizing fool! 

Trim-I'm almost finished painting my first builder pack of trim.  Never have I ever painted trim before.  Hopefully I don't mess it up! 

Speech Room-I've been reading a whole bunch of awesome speech blogs I found via Pinterest and I'm feeling so energized to try new things!  The ideas are just endless!!  Here's a few I've been frequenting:

http://www.speechtherapyforum.com/

http://www.playingwithwords365.com/

http://speechroomnews.blogspot.com/


I had to stop by Walmart on the way home to get some binders and new games for us to use in therapy.  More on that later.

Anyone get a "boost" to get organized lately?


Rory's Story Cubes

*Note-this is an older post that I originally wrote in March.  Things are moving and shaking around here, so stay tuned!


For all of you SLP's out there, stop what you're doing, drive to your nearest Target, and pick yourself up a set of these babies.


Or you could follow this link: http://www.storycubes.com/products/rorys-story-cubes/


I swear to you these make therapy preparation SOOOOO much easier for not a lot of money. I work in a middle school so my kids are a little "higher" if you will. Most of my speech kiddos who are at the conversational level use these to make up stories or tell a memory having to do with the picture. I've also used these with fluency in a similar manner to work on fluency shaping and stuttering modification. For language syntax I use dry erase sentence strips and these puppies to practice complex and compound sentences.


For those of you lucky enough to have elementary (I'm so jealous!) you could also do narrative language, vocabulary, simple sentences, articulation, etc. I hear there is also a series of "action" cubes that would be good for subject verb agreement.


Do you use Rory's Story Cubes? If so, what are you doing that's working well?

Sunday, April 15, 2012

April Showers

The story goes that April showers bring May flowers.  Right now they're just bringing me headaches!  Most of my on-going porch projects are dependent upon being able to take stuff outside to paint, moving things outside so they're out of the way, etc.  I know there's really no hurry but I HATE when things take for-ev-ur, for-ev-ur (are you thinking about The Sandlot now?)


I hope everyone had a great weekend!  My kids finished their state standardized assessments on Friday, rounding out a LONG week.  Eric and I played trivia on Saturday night with some good friends.  I LOVE TRIVIA!  We didn't win but did pretty decent. 


Anywhoo, if you follow me on Pinterest you might have figured out what I'm working on over here.  If not, allow me to show you some recent inspiration.


(also from craftynest.com)


Aren't they just gorgeous?!?!


I especially liked the idea of doing the hemp lanterns and I even had *all the stuff* on hand! (*I modified a pinch, using the leftover fabric stiffener and flour mixture from the Easter project I made here.)  It didn't work.  Probably because, duh, I changed the sticky stuff recipe.  I found that the hemp was too heavy and fell off of my bouncy ball.  So I switched to yarn and SHAZAM it worked!  Only problem was, it really wasn't the color I was going for.  Now you can understand why the April showers we've been having are testing my nerves.  They needed, wait for it, glossy white spray paint!


Here's where I'm at so far.  Think of this as a teaser.  It's not finished yet because it needs more paint and the light hanging kit.


Cool, huh?!


Darn having parent-teacher conferences two nights this week until 8:00 PM!  I probably won't get back to these anytime soon because I've also been put on trim painting duty.  YAY trim!  We had intended to get trim as our joint Christmas present, but we just got around to buying it.  Now my job is to paint so the Mr. can put it up.

Tuesday, April 10, 2012

Porch-tastic

We have a screened-in porch.  Pretty much, we moved in, plunked some stuff down in there, and haven't done anything with it since.  Until now.  But I'm not showing you that stuff, yet.


I love the glass windows.  It's hard to see in these pictures, but each panel actually tilts out.  Something that I do not love is the outdoor carpet. 


This is the furniture that Eric's grandmother gave us. Apparently it used to be bright white but when she had it repainted, the handyman said the store was out of white spray paint. Gasp! Out of white spray paint?!?!  The set has oodles of charm, but the peach color needs to go! 


Mr. light in the corner looks semi-cool in the picture, but in real life is a rusty mess.  I really did want to salvage him but the poor guy was in bad shape.

So there you have it.  The before.  Stay tuned for the updates!

Monday, April 9, 2012

Now Ya See it, Now Ya Don't

As promised here's a look at the outside shenanigans that went on at our casa last weekend.  If you'll remember, here's what our front landscaping looked like before:


We had a funky hedge in the front (to the far left of the picture) that was awkwardly short and some randomly placed bushes in the front garden bed.  I've had it out for the hedge for quite a while but figured it would be a long time before we focused on making the outside purty. 

Eric (who's THE man, by the way) surprised me by pulling out the nasty hedge for my birthday.  We got so many compliments that I think he got motivated to pull out the other ugly stuff we've been eying since we moved in.


Maybe not the hugest difference in the world, but it makes us pretty dang happy!  I really like that the stone fireplace is more visible now.  Here's a view from the front:


Granted it's very bare, but we're happy to have a blank slate to work with.  Neither of us knows a whole lot about landscaping, so we want to take our time researching where we'll go from here.  We've also got a couple landscaping gurus in mind whose brains we'll be picking very soon.

Here's what we do know: our house faces West and this bed only gets sun from about 1-4 PM.  We *think* our soil is relatively well-drained.


  On the To Do List:
  • Research, research, research!
  • Dig out existing rock and install new landscaping plastic or fabric
  • Look for/buy perennial plants that bring more color and texture to the space
    • Specifically looking for ornamental grasses and maybe a flowering bush or two
  • Replace current rock with a more contrasting color of rock or mulch
    • So far we're thinking either grayish/whitish/beigish rock or dark brown mulch
  • Integrate annuals, possibly in containers spaced throughout the bed

Have you ever tackled a landscaping project?  Are you a good resource for us?  We'd LOVE to hear from you :0)

Sunday, April 8, 2012

Envelope Pillows, No Sew Style

Happy Easter everyone!  I'm hoping to crank this post out before meeting my fam at church.  Eric and I have accidentally taken on yet another project that's been keeping us busy for the majority of our Easter vacation-more to come on that later!


You'll notice off to your right the beginning of a little grouping of throw pillows (I can't take credit for the blue one-that's a Marshall's find.)  Our office was overflowing with remnants of drapery fabric that I've been wanting to use up and I had some old pillows sitting around in the closet. 

I was tired of ripping seams every time I wanted to change my easy-peasy Home-Ec pillows (you know the type: sew on three and a half sides inside-out, turn right-side out, stuff, then finish by hand.) 

Rather than reinvent the wheel and type out all the directions, I'll just say that Texas Cottage had great directions that were super easy to follow.


Here's the first one I did on my sewing machine.  Easy enough.  Until Ethel (as I lovingly refer to the sewing machine) got a case of the shakes and needed to take a rest.  Ethel and I have a love-hate relationship.  Oh I was not happy with Ethel.

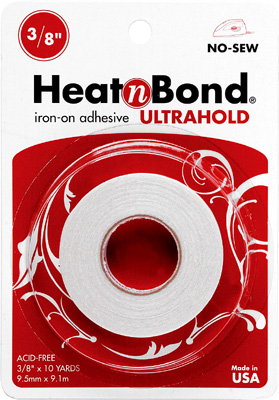
Enter this lovely invention.  I typically have at least one pack of this stuff on hand.


I followed the exact same directions as before, substituting the Heat N Bond for the sewing.  It took me half the time and I actually think that my no-sew pillow looks BETTER than my sewn pillows!


So for now, Ethel's sitting side-lined while Heat N Bond and I are BFF's. 

Have you ever tried no-sew pillows?  What other excellent projects do you use it as a sub for sewing?

Friday, April 6, 2012

Update Alert!

Pssssssssssttttt! Check out the updates on my "House Tour" page. (Pages are on the right, just scroll down underneath my "About Me" and "Blog Archives".)

Tuesday, April 3, 2012

One of those weeks

Oh my! It's been quite a while since my last post.  Welp, things have just been plum crazy at work.  We're gearing up to take our state test and it's IEP season, so that means a busy Lauren. 

I did start on some house projects over the that I'm SUPER excited to share later this week when I'm on break again. 

Here's something that made me happy this week: Sunshine over at Tatertots and Jello.  I think these would look superb in my gray and yellow bedroom.